Learn how to change garage door springs the right way. Follow our safe, step-by-step instructions to avoid costly mistakes and injury.
Garage door springs are essential for balancing the weight of your garage door, allowing it to open and close safely. Over time, these springs wear out and need to be replaced. If you’re thinking about doing this yourself, it’s important to know how to change garage door springs safely.

It’s important to understand that replacing garage door springs can be dangerous without the right tools and experience. The tension stored in the springs can cause severe injury if mishandled. Many homeowners hire a professional for this task, but thorough preparation and knowledge are key if you decide to proceed independently.
In this guide, we will explain what you need to know about changing garage door springs, common mistakes to avoid, and when it’s best to call a trained technician.
Understanding the Different Types of Garage Door Springs
Before learning how to change garage door springs, you must know what springs your system uses.
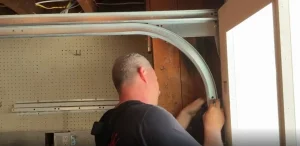
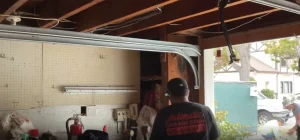
Torsion Springs
- Location: Torsion springs are typically mounted horizontally above the garage door opening, attached to a metal shaft that runs across the width of the door.
- Operation: These springs apply torque, or rotational force, to the shaft. When the door is opened or closed, the springs wind and unwind, storing and releasing energy to lift and lower the door.
- Common Usage: Torsion springs are the most common type used in modern garage doors due to their durability, smoother operation, and greater control over door movement. They are especially well-suited for heavier doors and provide more balanced lifting power.
- Advantages: Longer lifespan, quieter operation, and greater safety compared to extension springs.
Extension Springs
- Location: Extension springs are located on either side of the garage door, running parallel to the horizontal tracks. They are typically attached to the door frame at one end and to the cables or pulleys at the other.
- Operation: These springs function by stretching and contracting. As the garage door opens, the springs contract and help pull the door upward. When the door closes, the springs stretch and store potential energy for the next cycle.
- Common Usage: Extension springs are often found on older garage door systems or on lighter doors. They are a more affordable option but generally require more frequent maintenance and adjustment.
- Advantages: Lower initial cost and easier to install, though they tend to wear out faster and can pose greater safety risks if not equipped with safety cables.
Why Replacing Garage Door Springs Requires Caution
Many DIY enthusiasts underestimate the dangers involved in how to change garage door springs:
Springs Are Under High Tension
Garage door springs, whether torsion or extension, are engineered to counterbalance the heavy weight of the door, often several hundred pounds. This means they are wound or stretched under very high tension. If a spring suddenly releases that energy unexpectedly, it can unleash tremendous force in an instant, leading to serious injury or even death.
Improper Removal Can Cause Serious Injury or Property Damage
Many accidents occur when homeowners attempt to remove springs without understanding the correct procedure. Using the wrong tools, releasing tension in the wrong sequence, or simply underestimating how tightly wound the spring is can result in violent snapping or flying components. The sudden force can severely damage the garage door, tracks, or other surrounding property even if no one is injured.
Incorrect Installation May Lead to Functional Issues
Successfully replacing garage door springs requires precise adjustments and calibration. If the new springs are not installed correctly or the tension is not balanced properly, the door may operate unevenly or jerkily. An unbalanced door puts additional strain on the opener, leading to premature motor burnout or causing the door to come off its tracks entirely, a dangerous situation.
Hiring a Professional Is Often the Safest Option

Hiring a qualified professional is strongly recommended if you lack experience, proper training, or the specialized tools required for safe spring replacement. Professionals are trained to handle the inherent dangers of this task and can ensure your garage door operates safely and smoothly afterward. The investment in expert service is well worth it to avoid injury or expensive damage.
Tools and Safety Equipment You’ll Need
If you choose to proceed with how to change garage door springs, gather the following tools and equipment first:
- Winding bars (for torsion springs)
- Socket wrench set
- Vice grips or locking pliers
- Sturdy ladder
- Safety glasses and gloves
- Replacement springs rated for your door’s weight and size
Step-by-Step Guide: How to Change Garage Door Springs
1. Disconnect Power and Secure the Door
- Unplug the garage door opener to prevent accidental activation.
- Use vice grips to lock the door in place so it doesn’t move during the process.
2. Release Tension Safely
For torsion springs:
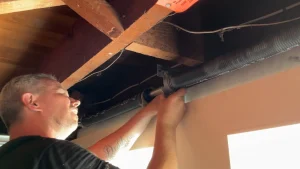
- Insert winding bars securely into the winding cone.
- Carefully unwind the spring in small increments while maintaining firm control.
For extension springs:
- Open the door fully to release most of the spring tension.
- Secure the door in the open position with clamps or vice grips.
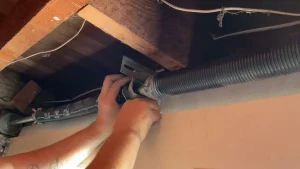
3. Remove the Old Springs
- Disconnect and remove the springs from their mounting points.
- Inspect cables, pulleys, and other components for wear.
4. Install the New Springs
- Mount the new springs according to the manufacturer’s specifications.
- Ensure proper alignment and secure attachment of all parts.
5. Tension the Springs Correctly
For torsion springs:
- Wind the springs with winding bars according to the correct number of turns.
For extension springs:
- Adjust the cable length and spring tension as needed.
6. Test Door Balance and Operation
- Carefully remove clamps or vice grips.
- Open and close the door manually to check for smooth, balanced operation.
- Reconnect the opener and perform a full operational test.
Common Mistakes to Avoid
When learning how to change garage door springs, avoid these common errors:
- Using improper or worn tools
- Failing to properly secure the door before starting
- Applying incorrect tension to the springs
- Attempting to reuse worn or damaged hardware
- Skipping essential safety gear like gloves and eye protection
When to Call a Professional

While some experienced DIYers may be capable of changing garage door springs, professional service is highly recommended in most cases:
- If you lack the proper tools or experience
- If your garage door has multiple springs or is unusually heavy
- If the door system includes advanced features like high-cycle springs
Professional technicians have the training, tools, and knowledge to handle this task safely and efficiently.
Maintenance Tips for Prolonging Spring Life
- Perform visual inspections monthly to check for signs of wear or rust
- Lubricate springs with a silicone-based spray every six months
- Schedule annual professional inspections to ensure proper system balance
- Avoid excessive opening and closing cycles that put strain on the springs
Frequently Asked Questions
How often should I change my garage door springs?
Garage door springs typically need to be replaced every 7 to 10 years, depending on how often the door is used. Heavy daily use may wear them out sooner, so watch for signs of wear or failure.
Is it safe to replace garage door springs?
Replacing garage door springs is not safe to do yourself unless you have the proper tools and experience. The springs are under high tension and can cause serious injury if handled incorrectly—it’s best to hire a professional.
Which way to wind a garage door spring?
Torsion springs should be wound in the opposite direction of how the door turns. Right-hand wound springs wind clockwise, and left-hand wound springs wind counterclockwise.
What happens if you put the wrong spring on a garage door?
Using the wrong spring can make the door unbalanced, causing it to be too heavy or too light. This can lead to unsafe operation, strain on the opener, or damage to the door system.
How many years do garage springs last?
Garage door springs usually last 7 to 10 years, or around 10,000 cycles (one open and close = one cycle). Choosing high-cycle springs and doing regular maintenance can help extend their lifespan.
Conclusion
Understanding how to change garage door springs is valuable knowledge for any homeowner. However, this task carries significant risks and should not be attempted lightly. Hiring a trained professional is the safest course of action if you are not completely confident in your skills and equipment.
Proper spring replacement ensures safe operation, balanced performance, and protection for your garage door system. Whether you choose to DIY or bring in the experts, prioritizing safety and using the correct methods is essential.
For homeowners in San Francisco, Automatic Garage Door Corporation offers expert spring replacement services performed by experienced technicians. We can help you maintain your system’s safety and functionality with professional care.
End Note
Automatic Garage Door Corporation has a team of highly trained professionals who install and repair all garage doors. We focus on safety, efficiency, and attention to detail. From start to finish, we work carefully to deliver reliable, high-quality results.
We offer a wide selection of garage doors and expert garage door repair services. Our team also specializes in LiftMaster openers and provides tailored solutions for commercial properties. Learn more about us on our About Us page, view examples of our work in our gallery, and stay informed with tips and updates on our blog.
We build trust through exceptional service and lasting relationships. If you need professional assistance with how to change garage door springs or any other garage door service, contact us today to schedule an appointment.
Automatic Garage Door Corporation
1020 Harrison St, San Francisco, CA 94103, United States
+14156486413